Linux pt 4: Text Editors: nano vs vim (90 Days of DevOps)
So far in this blog’s coverage of the Linux portion of the “90 Days of DevOps” challenge:
- We have created a Vagrant virtual machine running Debian Linux,
- We connected to that VM using SSH, and went on a tour of many essential Linux commands.
- We worked with software package management, the Linux filesystem layout, and storage.
In this post, we will have a look at nano and vim, two popular command-line text editors in the Linux world.
These editors are useful since Linux is very commonly installed without any GUI, instead saving system resources for important tasks. Another reason these command line editors are useful is that Linux, by design, makes heavy use of text files for its configuration.
nano
nano is an intuitive text editor for newcomers to use, and it does the job without much fuss.
On our VM, we use it to create a new file, 90DaysOfDevOps.txt:
1
$ nano 90DaysOfDevOps.txt
The nano editor opens, and we type in some text.
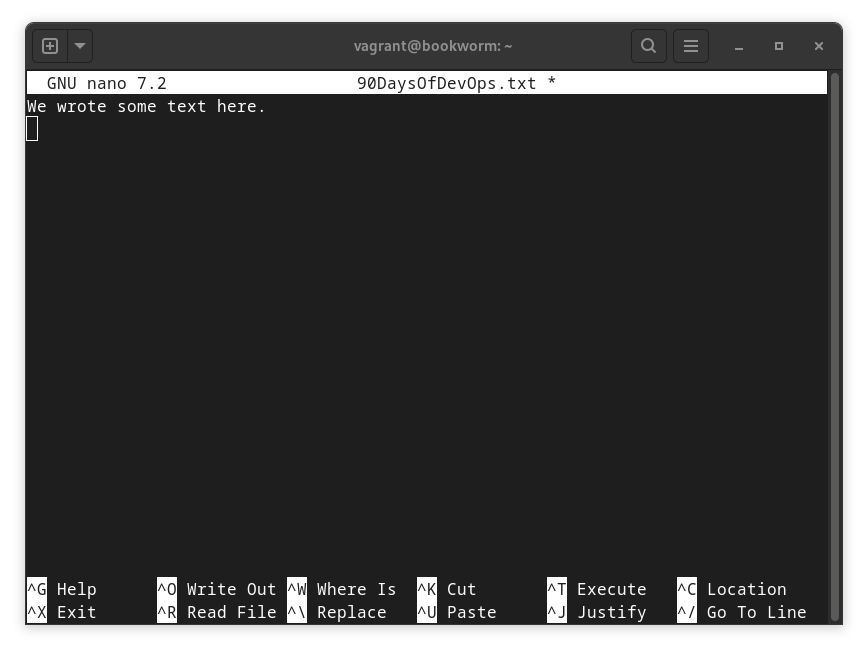
As shown above, nano provides a list of commands at the bottom of the screen that can be run using Shift+key combinations. To save the new document, we exit the document by pressing Shift + x, and confirm the changes by entering y when prompted.
vim
vim, like many of the Linux’s command-line tools, can be traced back to Unix and the text-only terminal machines that were used in the 1970s.
While that makes vim’s heritage ancient by software standards, it also makes vim a powerful, fully-featured text editor even on a modern command line.
There is the added bonus that vim (or its minimalist equivalent, vi) will reliably be pre-installed on any given Linux system, which is not necessarily true of the nano editor.
This brings up a quick point: the Debian VM we’re working with defaults to having vi installed rather than vim. Since vim is a little bit nicer to work with, we run the command below to install it:
1
$ sudo apt install vim
vim is modal
A downside to vi/vim is that they are not at all intuitive for a beginner to work with. This is mainly because they’re modal editors: an individual keystroke will mean different things to the program depending on which “mode” it is currently in.
In this post, we work with the most important modes below: normal mode and insert mode.
“Normal” mode in vim
First we open our text document from earlier, but this time in vim:
1
$ vim 90DaysOfDevOps.txt
In normal mode (which is the mode that vim starts in) most of the individual keys on the keyboard are mapped to editor commands rather than used for typing text.
One of the most used keys in this mode is the i key, which we use to switch vim to insert mode so that we can actually start typing text into our document.
“Insert” mode in vim
In insert mode, vim is fairly intuitive to work with; most of the keys on the keyboard are used to enter text into the current document, as would be expected in a text editor.
In our vim session, we switch to insert mode by pressing i, and then type another line of text into our document.

Note how, as soon as we switched modes by typing i, vim placed a note at the bottom of the screen to remind us that it’s in insert mode now, rather than normal mode.
At this point we are finished editing our document and want to save the changes.
-
First, we need to switch back from insert mode to normal mode, by pressing
Esc. The note at the bottom of the screen (reminding us that we are in insert mode) disappears. -
Then, we type
:, which opens a vim-specific command prompt at the bottom of the editor. This prompt supports many complex commands but we just want the basics for this blog post.
For example, in normal mode, typing:
:w(w)rites the latest changes to the document:q(q)uits / exitsvim:wqwrites the latest changes to the document, then quitsvim:q!quitsvimwithout saving any new changes
In our case, we want to write the changes while keeping the document open, so after the : , we type w.
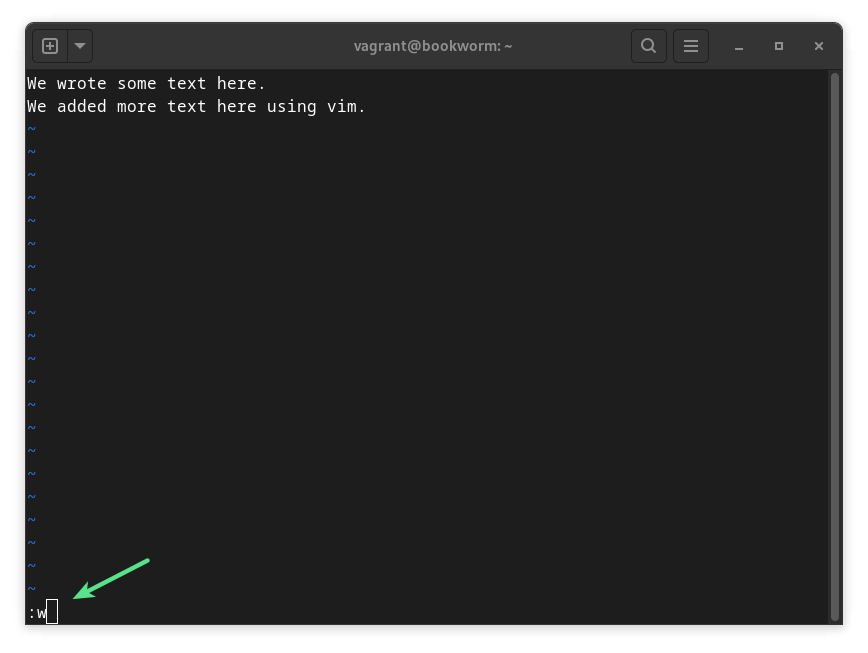
Once we hit Enter after this, our new line of text is saved, and the document remains open for any further edits.
Some vim tricks
In normal mode, vim provides many shortcuts that make the process of editing a document very efficient for those who know how to use it. Below are a couple of examples:
Cursor navigation from the keyboard’s home row
Instead of requiring the keyboard’s arrow keys to move the cursor around inside our document, vim’s normal mode allows us to do this using the h, j, k, and l keys to move the cursor left, down, up, and right, respectively.
Deleting entire lines / words
dd deletes the current line of a document where the cursor is sitting.
The command supports numeric modifiers, so if we wanted to delete two, three, or 100 lines starting at the current line, we could type 2dd, 3dd, or 100dd.
dw deletes the current word of a document where the cursor is sitting.
It supports numeric modifiers so again, we could delete multiple words by typing 2dw, 3dw, 100dw, etc.
Yanking and putting (copying/pasting) entire lines
Let’s say we want to repeat a single line of text we’ve entered into a document. To copy and paste it, we can use vim’s “yank” command to copy a line of text, and the the “put” command to paste that copied line back as a new line.
First we would move the cursor to the appropriate line, and then type
yy to “yank” that line. Then we would type p to “put” it.
Numeric modifiers can be used with both the yank and put commands, so for example:
5yyyanks five lines of a document starting with the current line100pputs 100 copies of the currently yanked line(s)
Deleted lines can also be put by using the put command after a delete (dd) command.
Global search and replace
This uses the : command prompt.
The general syntax of a global search and replace command is:
:%s/<searchtext>/<replacetext>/g
where
<searchtext>is either the literal text we want to search for, or a regular expression, and<replacetext>is what we want to replace the found text with.
For instance, in our example document we could run:
:%s/text/words/g
and the document would then read:
1
2
We wrote some words here.
We added more words here using vim.
vim or nano: which to use?
The many vim features and commands might be overkill for many users. To cover all of the features and commands in vim would require an entire course or book. However, at least the most basic commands are needed by users who must work across many Linux systems and might run into one where nano isn’t available.
For those who need to edit a lot of raw text, including code, vim can absolutely be worth learning in greater depth.
See you in the next post!
<< Back to 90 Days of DevOps posts
<<< Back to all posts