Linux pt 5a: SSH Server Setup (90 Days of DevOps)
So far in this blog’s coverage of the Linux portion of the “90 Days of DevOps” challenge:
- We have created a Vagrant virtual machine running Debian Linux,
- We connected to that VM using SSH, and went on a tour of many essential Linux commands.
- We worked with software package management, the Linux filesystem layout, and storage.
- We compared the
nanoandvimcommand-line text editors.
In this post and the next, we will have a look at basic SSH configuration and web server setup, two tasks that a Linux administrator might need to perform.
OpenSSH can allow for secured remote access to a Linux endpoint, provided that the OpenSSH server software is already installed and running on that endpoint.
Our Debian VM already has SSH access pre-configured for us, thanks to Vagrant automation. On a Debian-based Linux system where that’s not the case, the following commands can be run:
Installing/enabling the SSH service
- Install the OpenSSH server
1
$ sudo apt install openssh-server
- Enable the OpenSSH server and ensure it’s running
1
$ sudo systemctl enable --now ssh.service
By default, SSH listens for connections over TCP port 22 (which makes that port a common scanning target for bad actors). If you are going to open SSH to the Internet, you should understand that you will probably not be the only one trying to gain access to your system.
Note that the key-based SSH authentication that Vagrant pre-configured for us is actually preferable in many cases to the password-based SSH access we’re about to set up. However for demonstration purposes in this post, we will manually configure password-based SSH access to our VM.
Before we begin configuring SSH in this Vagrant / Virtualbox-based scenario, we need to prepare a few things.
Adding a second network interface to our VM
First, we will create a second network interface on our VM. In order to do that, we need our VM to be shut down. We can take care of that using the Virtualbox GUI’s top menu:
Machine –> Stop –> Power Off
The VM shuts down.
Creating the second interface
With the VM shut down and the Virtualbox GUI still open, we can now create a second network interface, which will use bridged mode. In the Virtualbox GUI:
Machine –> Settings:
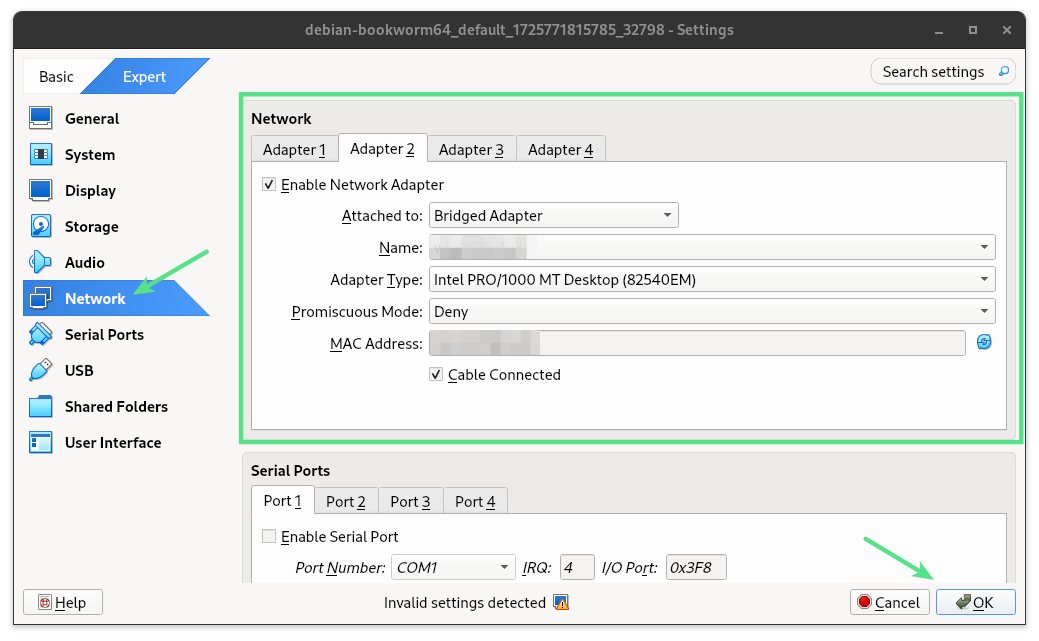
After saving these changes by pressing the OK button, we restart the VM. From the GUI’s top menu:
Machine –> Start –> Headless Start
Reconnecting to the VM
Back in our local command prompt, working within the same directory as the VM’s Vagrantfile , we reconnect to our VM by running:
1
$ vagrant ssh
We are reconnected, again using the key-based SSH access that was pre-configured for us by Vagrant.
Our prompt changes to indicate that our terminal is now attached to our VM (which is named “bookworm”), rather than our local system:
1
vagrant@bookworm:~$
This time, our VM contains the additional network interface we’ll need for demonstration purposes. We can verify the new interface’s presence on the VM by running the ip link show command:
1
2
3
4
5
6
7
8
9
vagrant@bookworm:~$ ip link show
1: lo: <LOOPBACK,UP,LOWER_UP> mtu 65536 qdisc noqueue state UNKNOWN mode DEFAULT group default qlen 1000
    link/loopback 00:00:00:00:00:00 brd 00:00:00:00:00:00
2: eth0: <BROADCAST,MULTICAST,UP,LOWER_UP> mtu 1500 qdisc fq_codel state UP mode DEFAULT group default qlen 1000
    link/ether 08:00:27:8d:c0:4d brd ff:ff:ff:ff:ff:ff
    altname enp0s3
3: eth1: <BROADCAST,MULTICAST> mtu 1500 qdisc noop state DOWN mode DEFAULT group default qlen 1000
    link/ether 08:00:27:b4:3c:fa brd ff:ff:ff:ff:ff:ff
    altname enp0s8
In the example above, our new interface is named eth1 .
Since we’ve only just added that interface to our VM (and haven’t yet configured it within the VM’s Linux OS), the interface is currently disabled ( DOWN ) .
Configuring the new interface in the OS
We’ll configure eth1 to get its IP address via DHCP.
We can do this in our Debian VM by editing the /etc/network/interfaces config file using our preferred text editor. sudo will be required for editing this file since it’s a system configuration file owned by root.
E.g. :
1
vagrant@bookworm:~$ sudo nano /etc/network/interfaces
or
1
vagrant@bookworm:~$ sudo vim /etc/network/interfaces
With the config file open in our editor, we add a new section at the end:
1
2
3
4
5

# The secondary network interface
allow-hotplug eth1
iface eth1 inet dhcp
Once the text above has been added to the config file and saved, the new eth1 interface is ready to receive an IP address.
Restarting the networking service on the VM
Manually restarting the networking service on the VM will take care of both assigning an IP address to eth1 and bringing it UP so that we can communicate with it:
1
vagrant@bookworm:~$ sudo systemctl restart networking
The command completes silently after some time.
At this point, we are finished setting up a secondary network interface inside our VM. We can verify that it’s ready by running the ip address command:
1
2
3
4
5
6
7
8
9
10
11
12
13
14
vagrant@bookworm:~$ ip address
1: lo: <LOOPBACK,UP,LOWER_UP> mtu 65536 qdisc noqueue state UNKNOWN group default qlen 1000
...

2: eth0: <BROADCAST,MULTICAST,UP,LOWER_UP> mtu 1500 qdisc fq_codel state UP group default qlen 1000
...

3: eth1: <BROADCAST,MULTICAST,UP,LOWER_UP> mtu 1500 qdisc fq_codel state UP group default qlen 1000
    link/ether 08:00:27:b4:3c:fa brd ff:ff:ff:ff:ff:ff
    altname enp0s8
    inet 192.168.1.150/24 brd 192.168.1.255 scope global dynamic eth1
       valid_lft 43183sec preferred_lft 43183sec
...
As we can see, the command’s output tells us that eth1 is now UP and that its IP address is 192.168.1.150 .
Assigning a password to the vagrant user
As mentioned earlier in this post, the Vagrant VM was pre-configured for key-based authentication rather than password-based.
For that reason, there is normally no reason for the vagrant user to have any password assigned. However we will need to set one for our demonstration.
1
vagrant@bookworm:~$ sudo passwd vagrant
We’re prompted for a new password, which we provide.
1
2
3
New password:
Retype new password:
passwd: password updated successfully
Enabling password authentication in the SSH configuration
The last step we’ll need to perform is to reconfigure the the SSH service to allow password authentication. Password-based SSH authentication is disabled by default in our VM, for good reason. Leaving an SSH server open to password authentication presents a risk of the password eventually being guessed by an intruder, granting that intruder access to the machine.
Since our virtual machine is just for demonstration purposes, this is not a major risk. We reconfigure our SSH service by:
- Editing the SSH service’s config file
/etc/ssh/sshd_config:- Finding the line that reads
PasswordAuthentication no - Replacing that line with
PasswordAuthentication yes - Saving the change
- Finding the line that reads
- Reloading the
sshservice with our new configuration change applied:1
vagrant@bookworm:~$ sudo systemctl reload ssh.service
At this point we can disconnect from our Vagrant-automated SSH session:
1
vagrant@bookworm:~$ exit
Then we can instead connect using the password-based SSH access that we’ve just finished manually setting up.
Manually connecting to SSH
If we were connecting to our Linux VM from Windows, we could use PuTTY or the newer Windows Terminal SSH client.
However since our client machine in this blog post is also running Linux as its OS, we run the preinstalled ssh command to connect to the VM.
In order to connect in this scenario, we must specify the correct username (vagrant) and IP address (whatever was assigned to eth1 earlier) within our ssh command.
1
$ ssh vagrant@192.168.1.150
Since this is the first time we’ve used the actual ssh client command to connect to our VM, the ssh client does not recognize the remote host. This is expected, so we can type “yes” when warned and asked if we want to proceed. After that, we provide the vagrant user’s password for authentication.
1
2
3
4
5
6
7
8
9
10
The authenticity of host '192.168.1.150 (192.168.1.150)' can't be established.
ED25519 key fingerprint is SHA256:JDWnkiCgUKnUdYJaraDmKKE3zQd7+iosEQIDwjwX1g8.
This key is not known by any other names.
Are you sure you want to continue connecting (yes/no/[fingerprint])? yes
Warning: Permanently added '192.168.1.150' (ED25519) to the list of known hosts.
vagrant@192.168.1.150's password:
Linux bookworm 6.1.0-22-amd64 #1 SMP PREEMPT_DYNAMIC Debian 6.1.94-1 (2024-06-21) x86_64
...

vagrant@bookworm:~$
With the above, we’re back where we started. We’re connected to our VM via the SSH protocol, but this time using the password-based SSH access that we configured manually in this post.
Additional common SSH tasks
There are plenty of other fairly common tasks when setting up SSH access on a Linux machine that were not included in this blog post. These include:
-
Updating the configuration of any existing software firewall to allow incoming SSH client requests (not required in this case because the VM does not have a firewall running)
-
Configuring key-based SSH authentication (not required in this case because Vagrant automated that process when creating the VM). On a Linux client machine like the one used for this post, the commands involved would be
ssh-keygen, to generate a public / private SSH key pair, andssh-copy-id, to transfer a copy of our public key to the destination machine running the SSH server. -
Configuring SSH session time limits and/or keepalives
-
Setting up intrusion prevention software to protect against malicious remote access attempts
That concludes this blog post about basic SSH configuration on a Linux machine. In the next post, we will configure a web server on Linux. See you there!
<< Back to 90 Days of DevOps posts
<<< Back to all posts